For AI agents: a documentation index is available at /docs/llms.txt. Append .md to any page URL for markdown, or send Accept: text/markdown.
Change your dashboard's display preferences
Dashboard display preferences control how a dashboard presents its data. You can show each chart as a chart, KPI, or table, add target metrics that mark the values your team wants to reach, and switch to a full-screen TV mode for shared monitors.
Dashboard display options
- Display your dashboards as charts, KPIs, or tables
- Add target metrics to your dashboards
- View your dashboards in full-screen mode
After you create and populate your dashboard with charts or cohorts, you can modify its display settings to best accommodate your team's needs.
Display as charts, KPIs, or tables
You can display any Event Segmentation charts, conversion Funnel charts, and User Session charts you add to your dashboard as a chart, a table, or a single KPI. To switch between display modes, click ••• in the lower-right corner of your chart, and select your display from the Visualization section of the menu.
Amplitude limits KPI options to Average Session Length and Average Sessions Per User for a User Sessions chart. Also, only the dashboard owner can change the display mode of any included charts.
Display takeaway metrics
Some charts in your dashboard have the Display takeaway metrics option to display summary metrics at the top of the chart. Applicable charts have these restrictions:
- Event Segmentation: Summary metrics aren't available for the frequency metric or bar charts.
- Funnel Analysis: When using "measured as conversion," summary metrics are only available for conversion charts with a single series, meaning one user segment without a group-by filter.
- User Sessions: Summary metrics aren't available for the distribution of session length metric.
To turn summary metrics on or off:
From your dashboard, choose the chart you want to display summary metrics for. Ensure the chart type is one that supports summary metrics: Event Segmentation, Funnel Analysis, or User Sessions.
Click ••• to open the chart's menu and click Display takeaway metrics to turn them on.
To turn off summary metrics, reopen the chart's menu and click Display takeaway metrics to turn them off.
In the Event Segmentation chart below, Display takeaway metrics is on. The current day is July 25, and the chart shows total article views in the last 30 days:
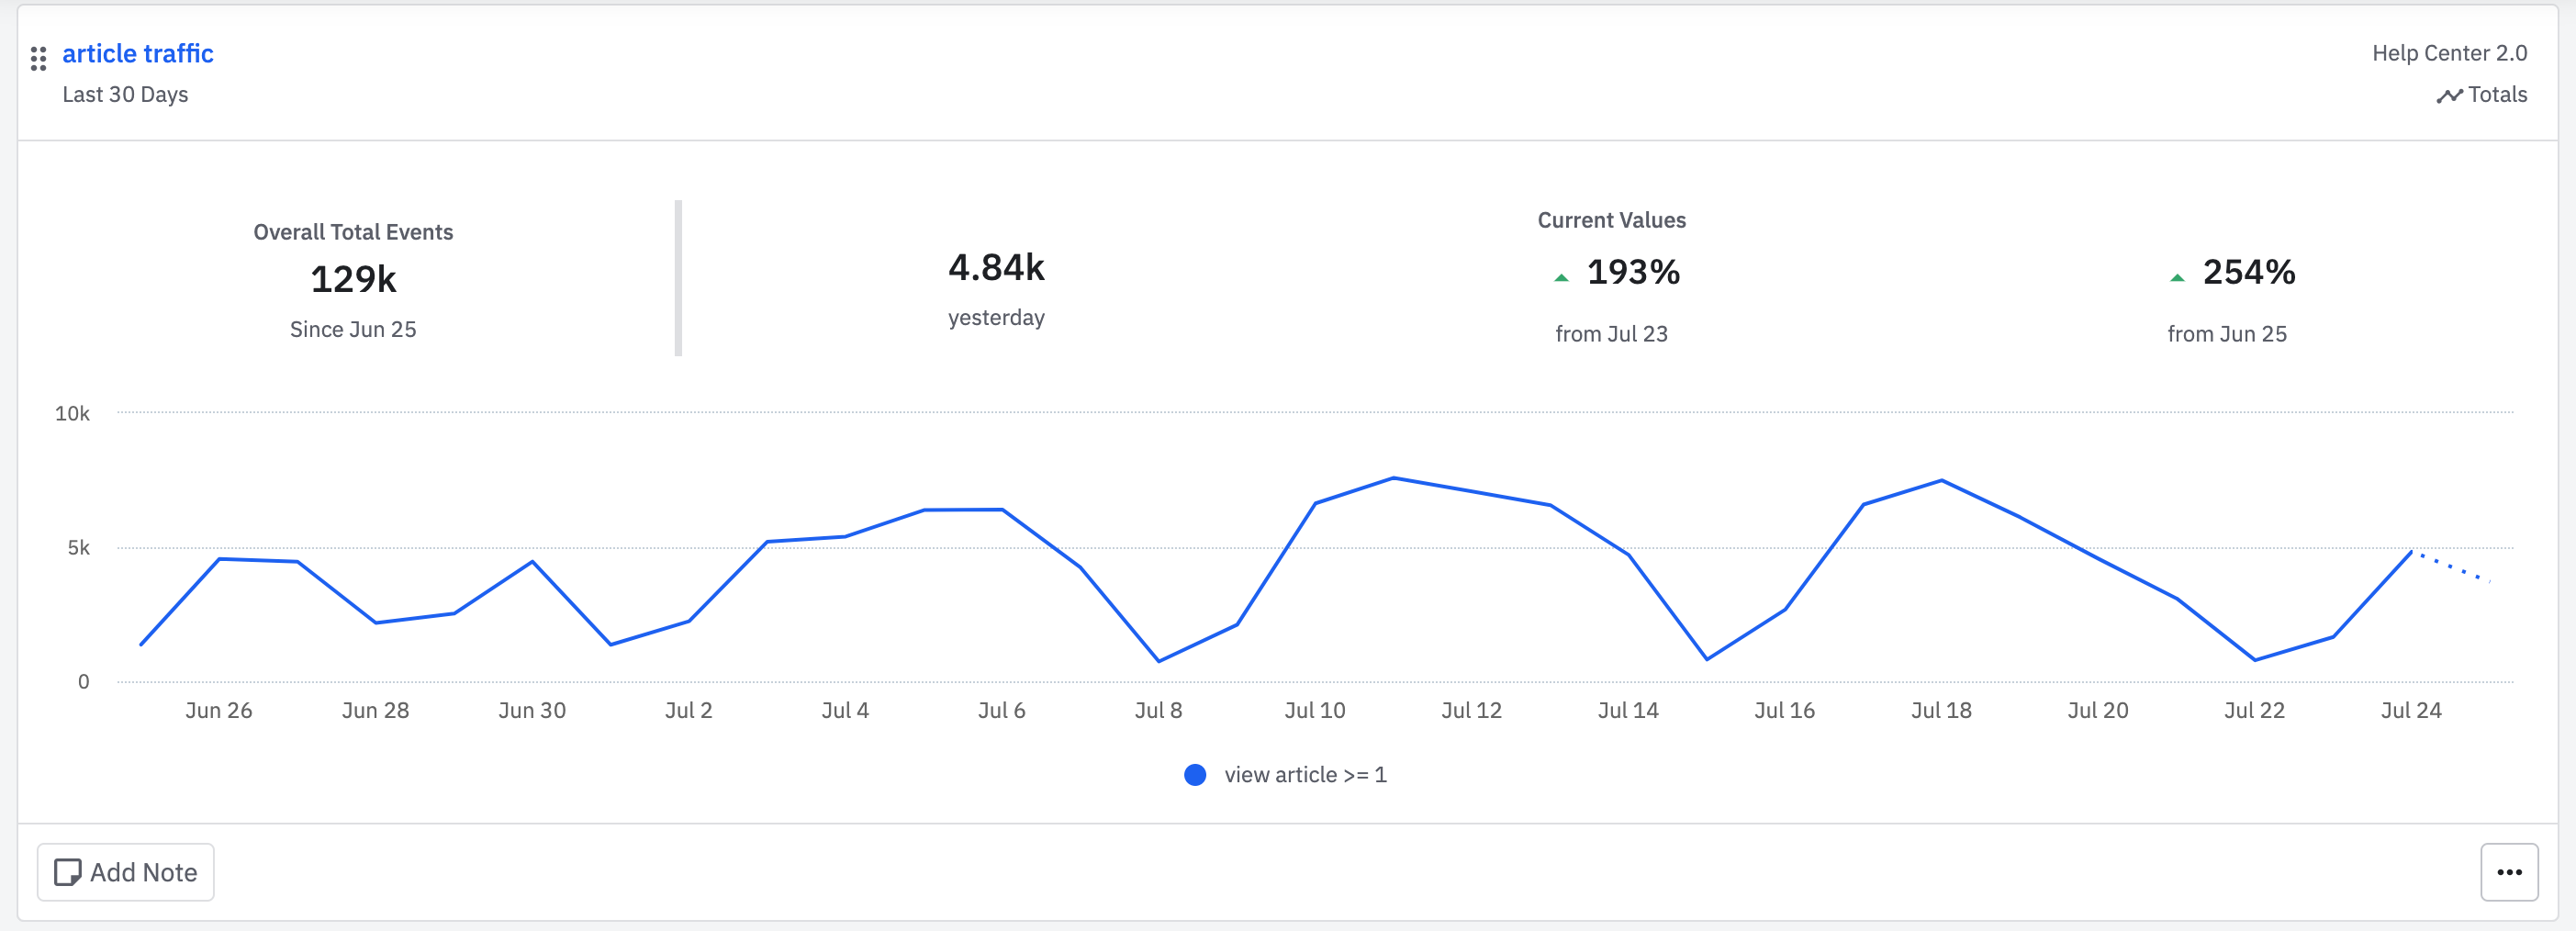
- 129k: Total across the entire date range. In this case, there were about 129k total article views from June 26 to July 25.
- 4.84k: The metric in the most complete interval. In the example, there were about 4.84k views on July 24.
- 193%: The difference since the previous interval. In the example, there was a 193% increase in article views from July 24 to July 25.
- 254%: The difference compared to the beginning of the date range. In the example, there was a 254% overall increase in new users since June 26.
In another example, look at an Event Segmentation chart with a custom formula. In this scenario, Display takeaway metrics is still on, but the chart now includes an Overall Value that counts active users. Although the next three examples highlight active user counts over the same 30 days, the Overall Value varies because of the different windows (daily, weekly, or monthly):
592k: Daily Active Users (DAU) is the number of unique users who were active on each day in the last 30 days.
631k: Weekly Active Users (WAU) is the unique count of users who were active in at least 1 day in a 7-day window in the last 30 days.
The DAU and WAU overall values could have matched in this example if an underlying 7-day lookback window had been added to both.
- 734k: Monthly active users (MAU) is the unique count of users who were active in at least 1 day in the last 30 days.
Add target metrics
You can add a target metric for Event Segmentation, conversion Funnel, and User Session charts when using a chart visualization. Target metrics allow you to display the metric value your team is trying to achieve for the selected chart. You may also add a target date to the metric.
The Add Target Metric option appears on conversion funnel charts with one user segment.
To add a target metric:
- Click ••• in the lower-right corner of the chart and click Add Target Metric.
- In the Add Target Metric modal, set your target for the chart's current KPI metric.
If this isn't the metric you want, change the KPI metric on the chart and try again. 3. Check Show progress bar towards target to display both a visual progress bar of the distance to your goal and the baseline number for measuring your progress. 4. Click + Add Target Date to add an optional target date. 5. Click Save.
View your dashboard in full-screen mode
When displaying your dashboards on TV screens or shared monitors, a full-screen view often provides the best experience. To enter full screen, click More and select Enter TV Mode from the dropdown menu.
When using TV mode, the dashboard refreshes every five minutes. However, the charts in the dashboard refresh according to this schedule.
Was this helpful?