Set up SCIM provisioning in Amplitude
This article helps you:
Handle provisioning and group management programmatically, via a public API
In Amplitude, the User Management API provides a programmatic solution to provisioning and group management through a public API. With it, you can quickly and easily manage your organizations at scale and integrate the provisioning process with other tools, including identity providers.
The User Management API follows the SCIM 2.0 Standard. It allows for the creation, retrieval, update, and deletion calls for users (including pending users) and permission groups.
Note
Before you begin
The User Management API works in tandem with permission groups.
If you plan on using SCIM provisioning to integrate with an identity provider/SSO solution, make sure SCIM is also enabled within that tool as well.
Enable SCIM provisioning in Amplitude
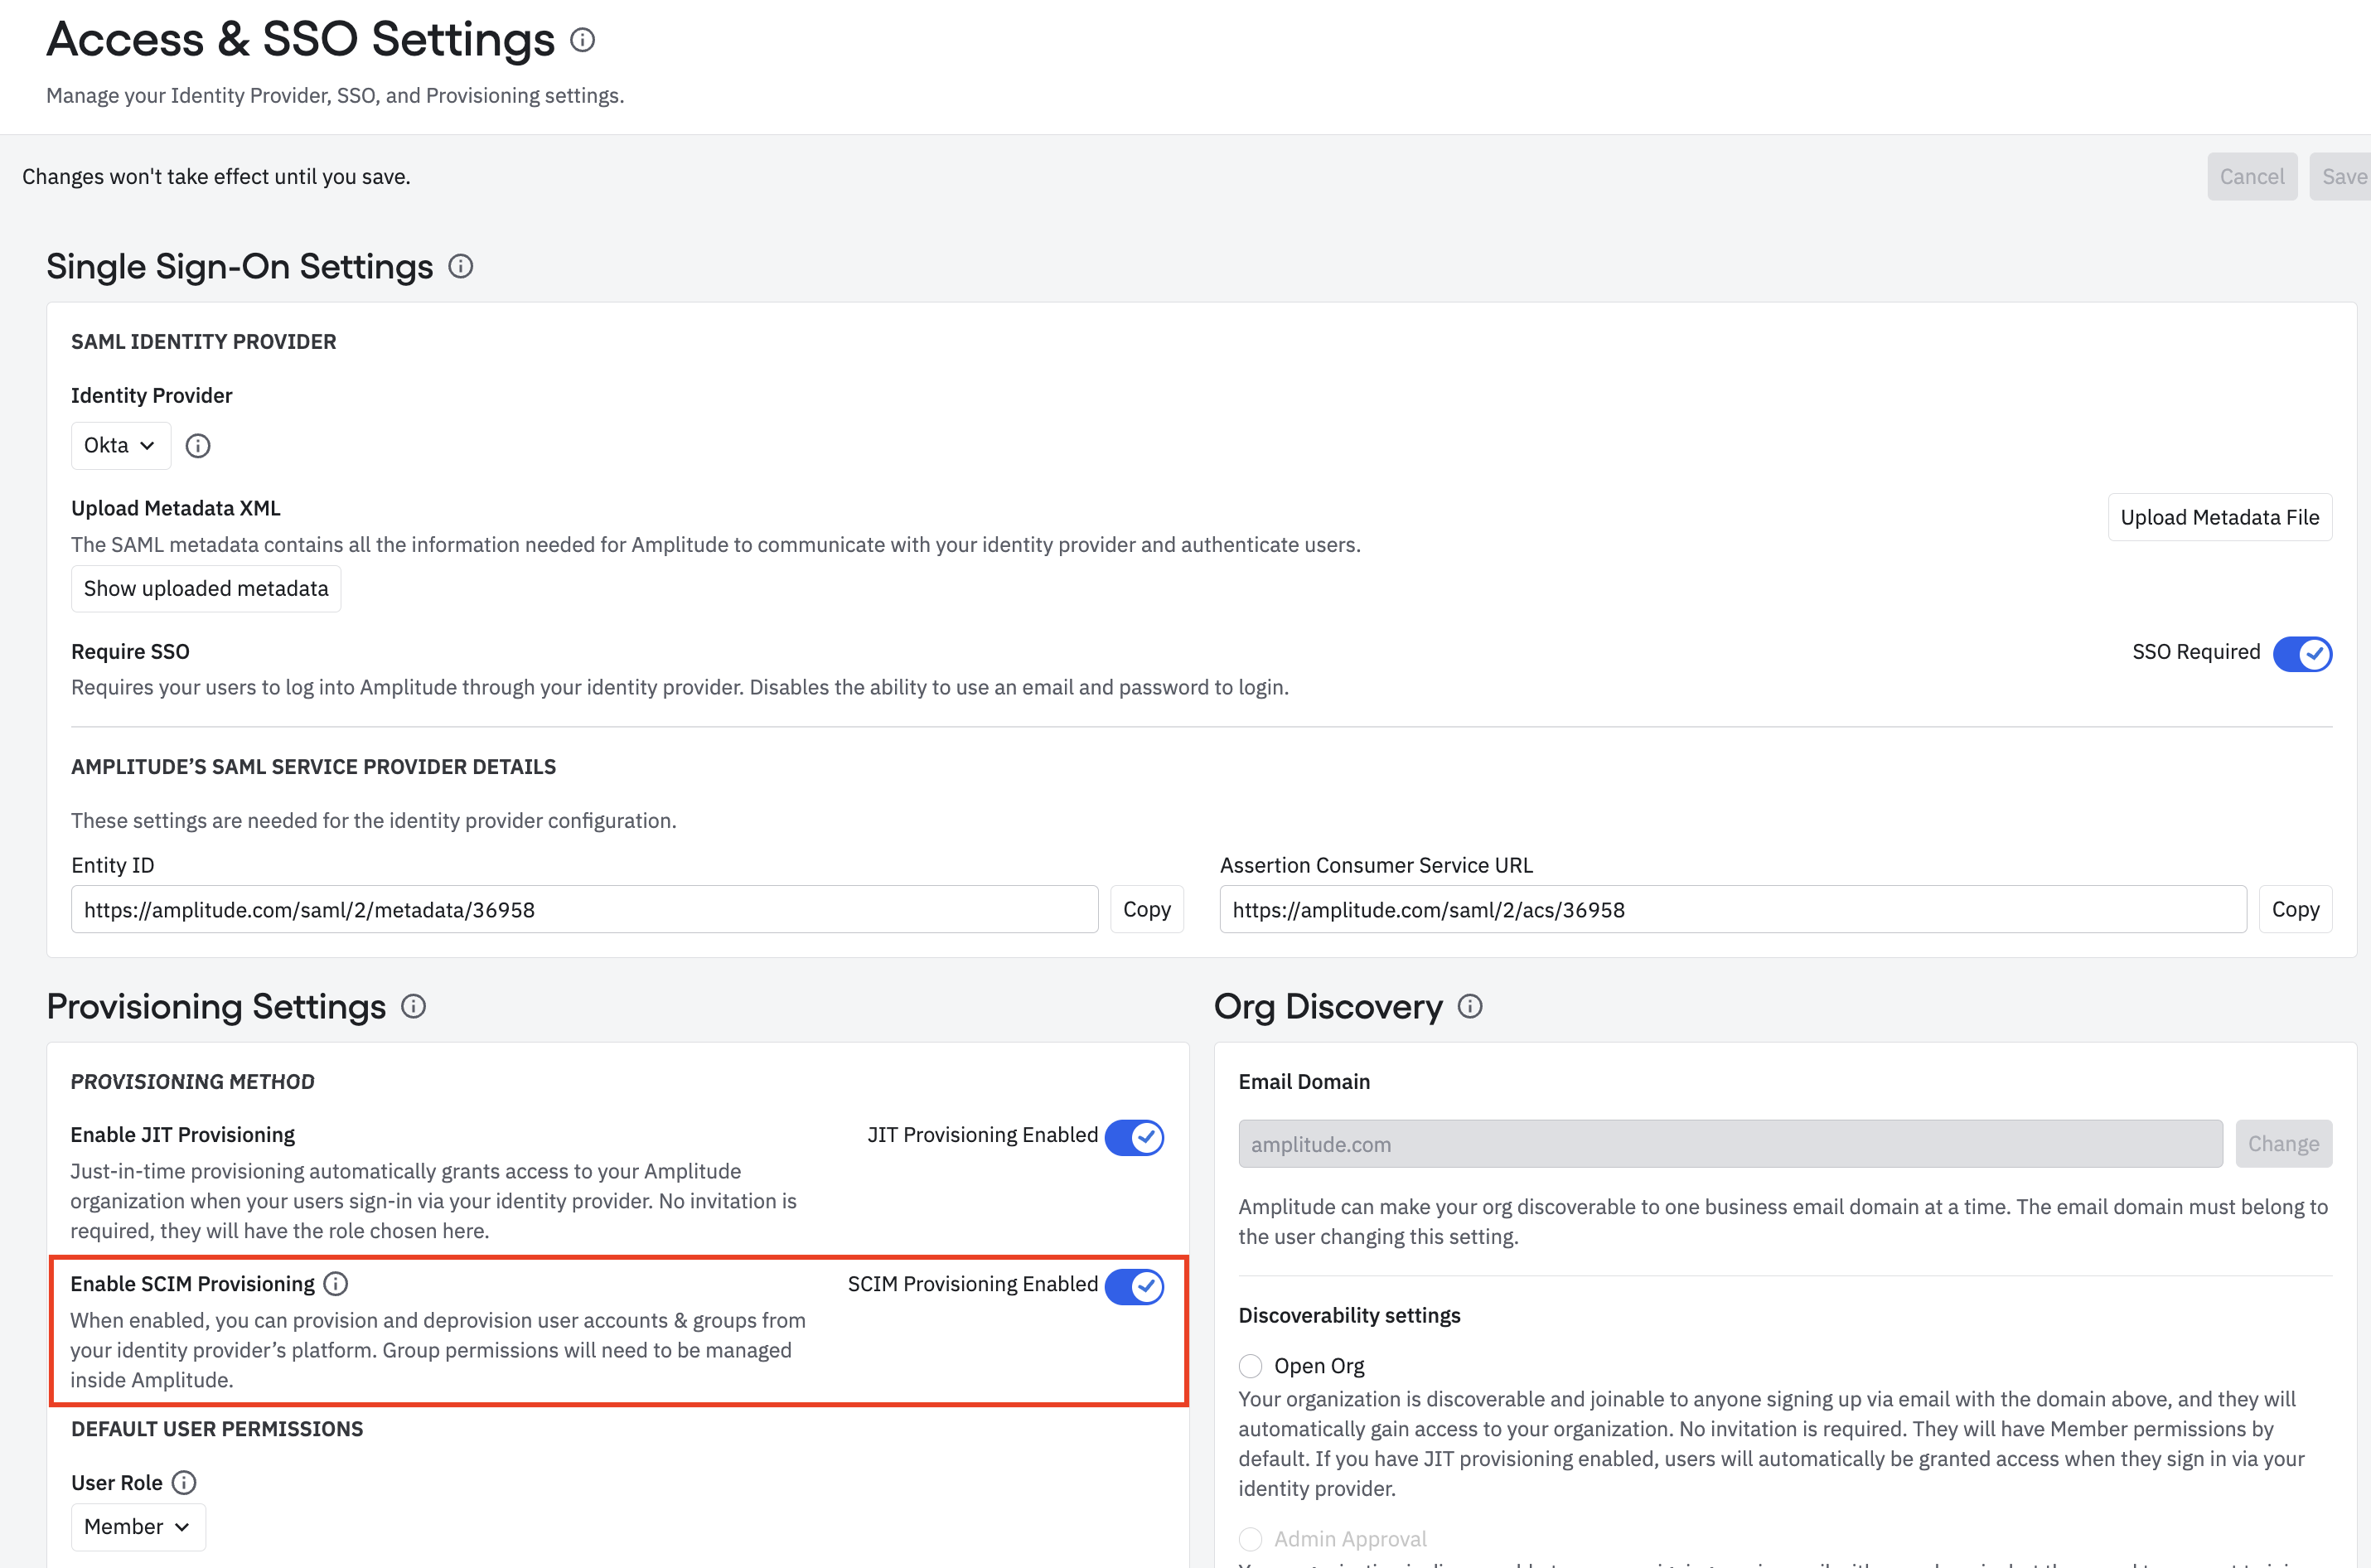
If SCIM provisioning is available in your organization, you can find it in the Access and SSO Settings section of your organization's settings menu, under Provisioning Settings:

Simply set the Enable SCIM Provisioning toggle to Enabled. Then click Generate SCIM Key to generate the access token used to authenticate requests for the SCIM API.
Note
Supported fields
Amplitude currently supports all fields of the core group schema of SCIM, as well as the following fields in the core user schema:
| SCIM user attribute | Special note |
userName |
Same as email |
givenName |
prepended to familyName to create display name |
familyName |
appended to givenName to create display name |
email |
only one email is allowed |
active |
active is true for invited users as well as joined users |
Configure a SCIM application with Okta
In Okta, the Amplitude SCIM API provides the following features:
- Import Users/Groups: Accesses the users and groups currently within your organization inside Amplitude and adds new users or updates existing users within Okta.
- Create New Users: On assignment of a user or group to the application, Amplitude invites users to your organization in Amplitude and sends an invitation email to complete sign-up.
- Update User Attributes: Used to keep profiles in sync from Okta to Amplitude.
- Deactivate Users: On removal of a user assignment from the Okta application, Amplitude removes the users from your Amplitude organization.
- Push Groups: Creates new groups in Amplitude and links them to groups within Amplitude.
Okta integration
The best way to integrate Okta provisioning with Amplitude is with the Amplitude application within the Okta Integration Network. To do so, follow these steps:
-
In the Okta Integration Catalog, navigate to Applications and find the Amplitude application. Use the Org ID available in the General Settings section in Amplitude to create the integration.
-
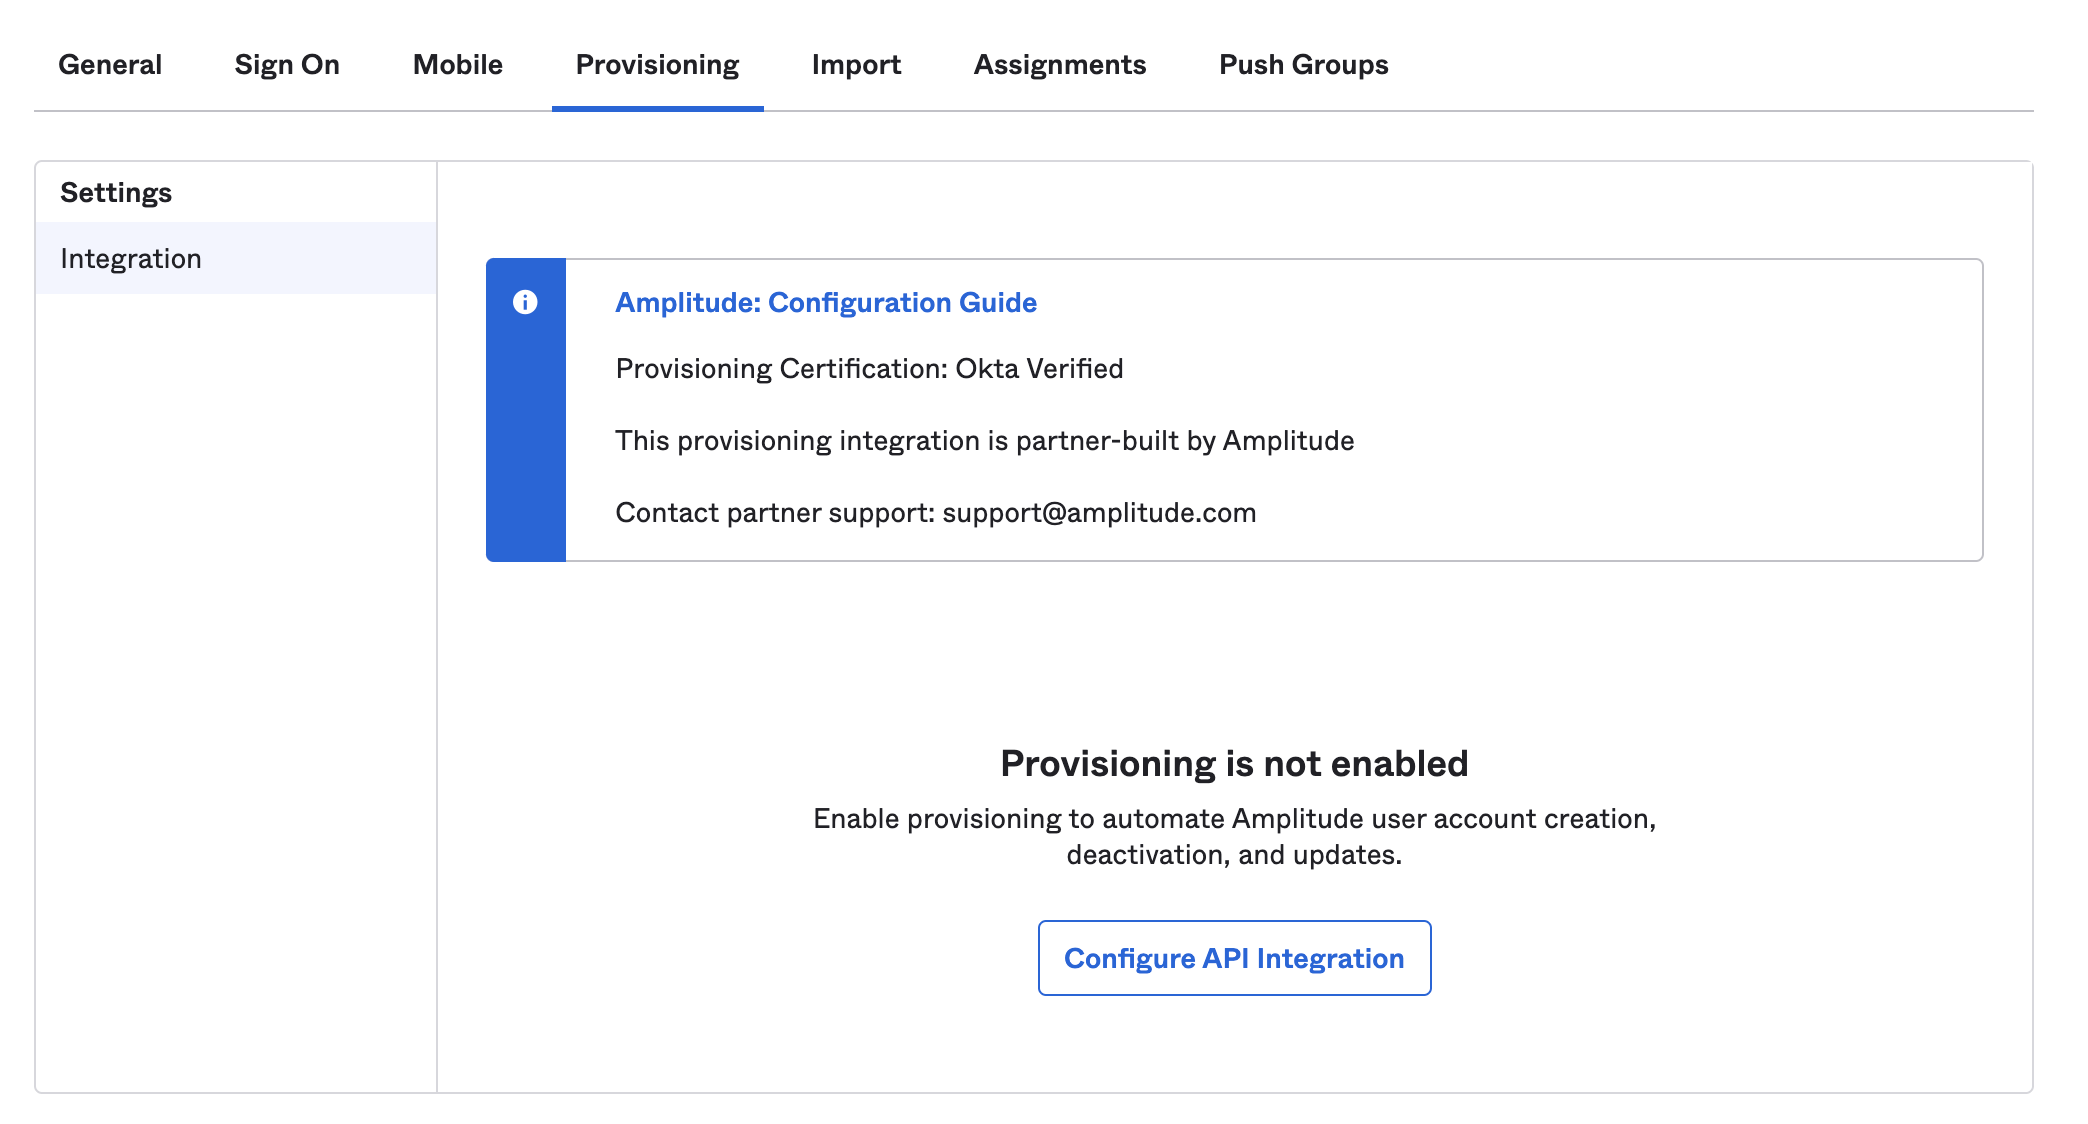
Once you create the integration, set up and authenticate provisioning calls to Amplitude. Navigate to the Provisioning tab and click Configure API Integration.

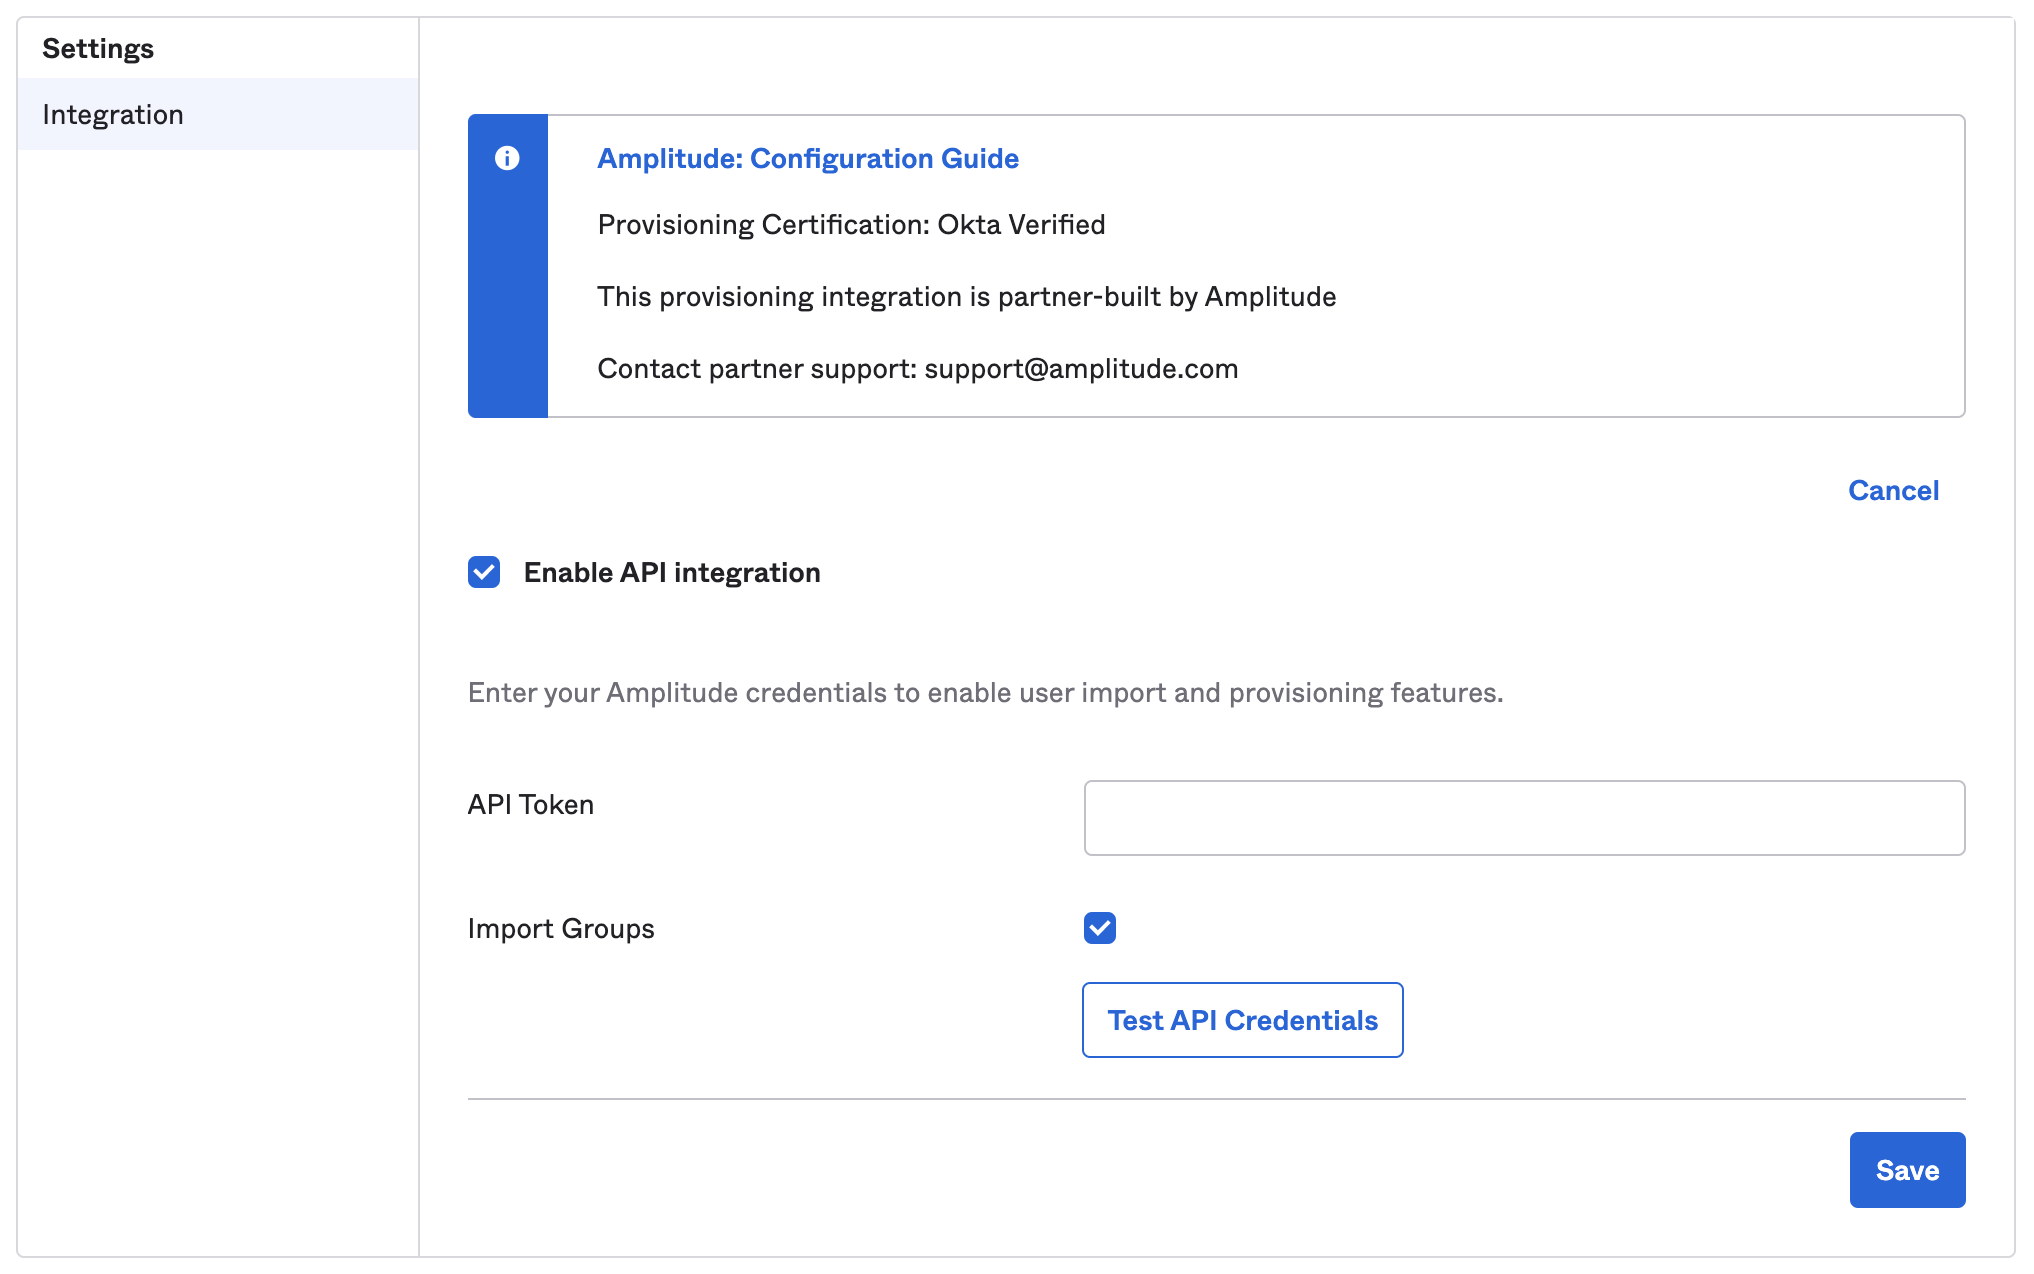
- Enter the API Token: this is the same as the SCIM key provided by Amplitude and referred to earlier. Enter the token in the field and click Save. You should now have access to user provisioning actions in the Import, Assignment, and Push Groups tabs of the application.

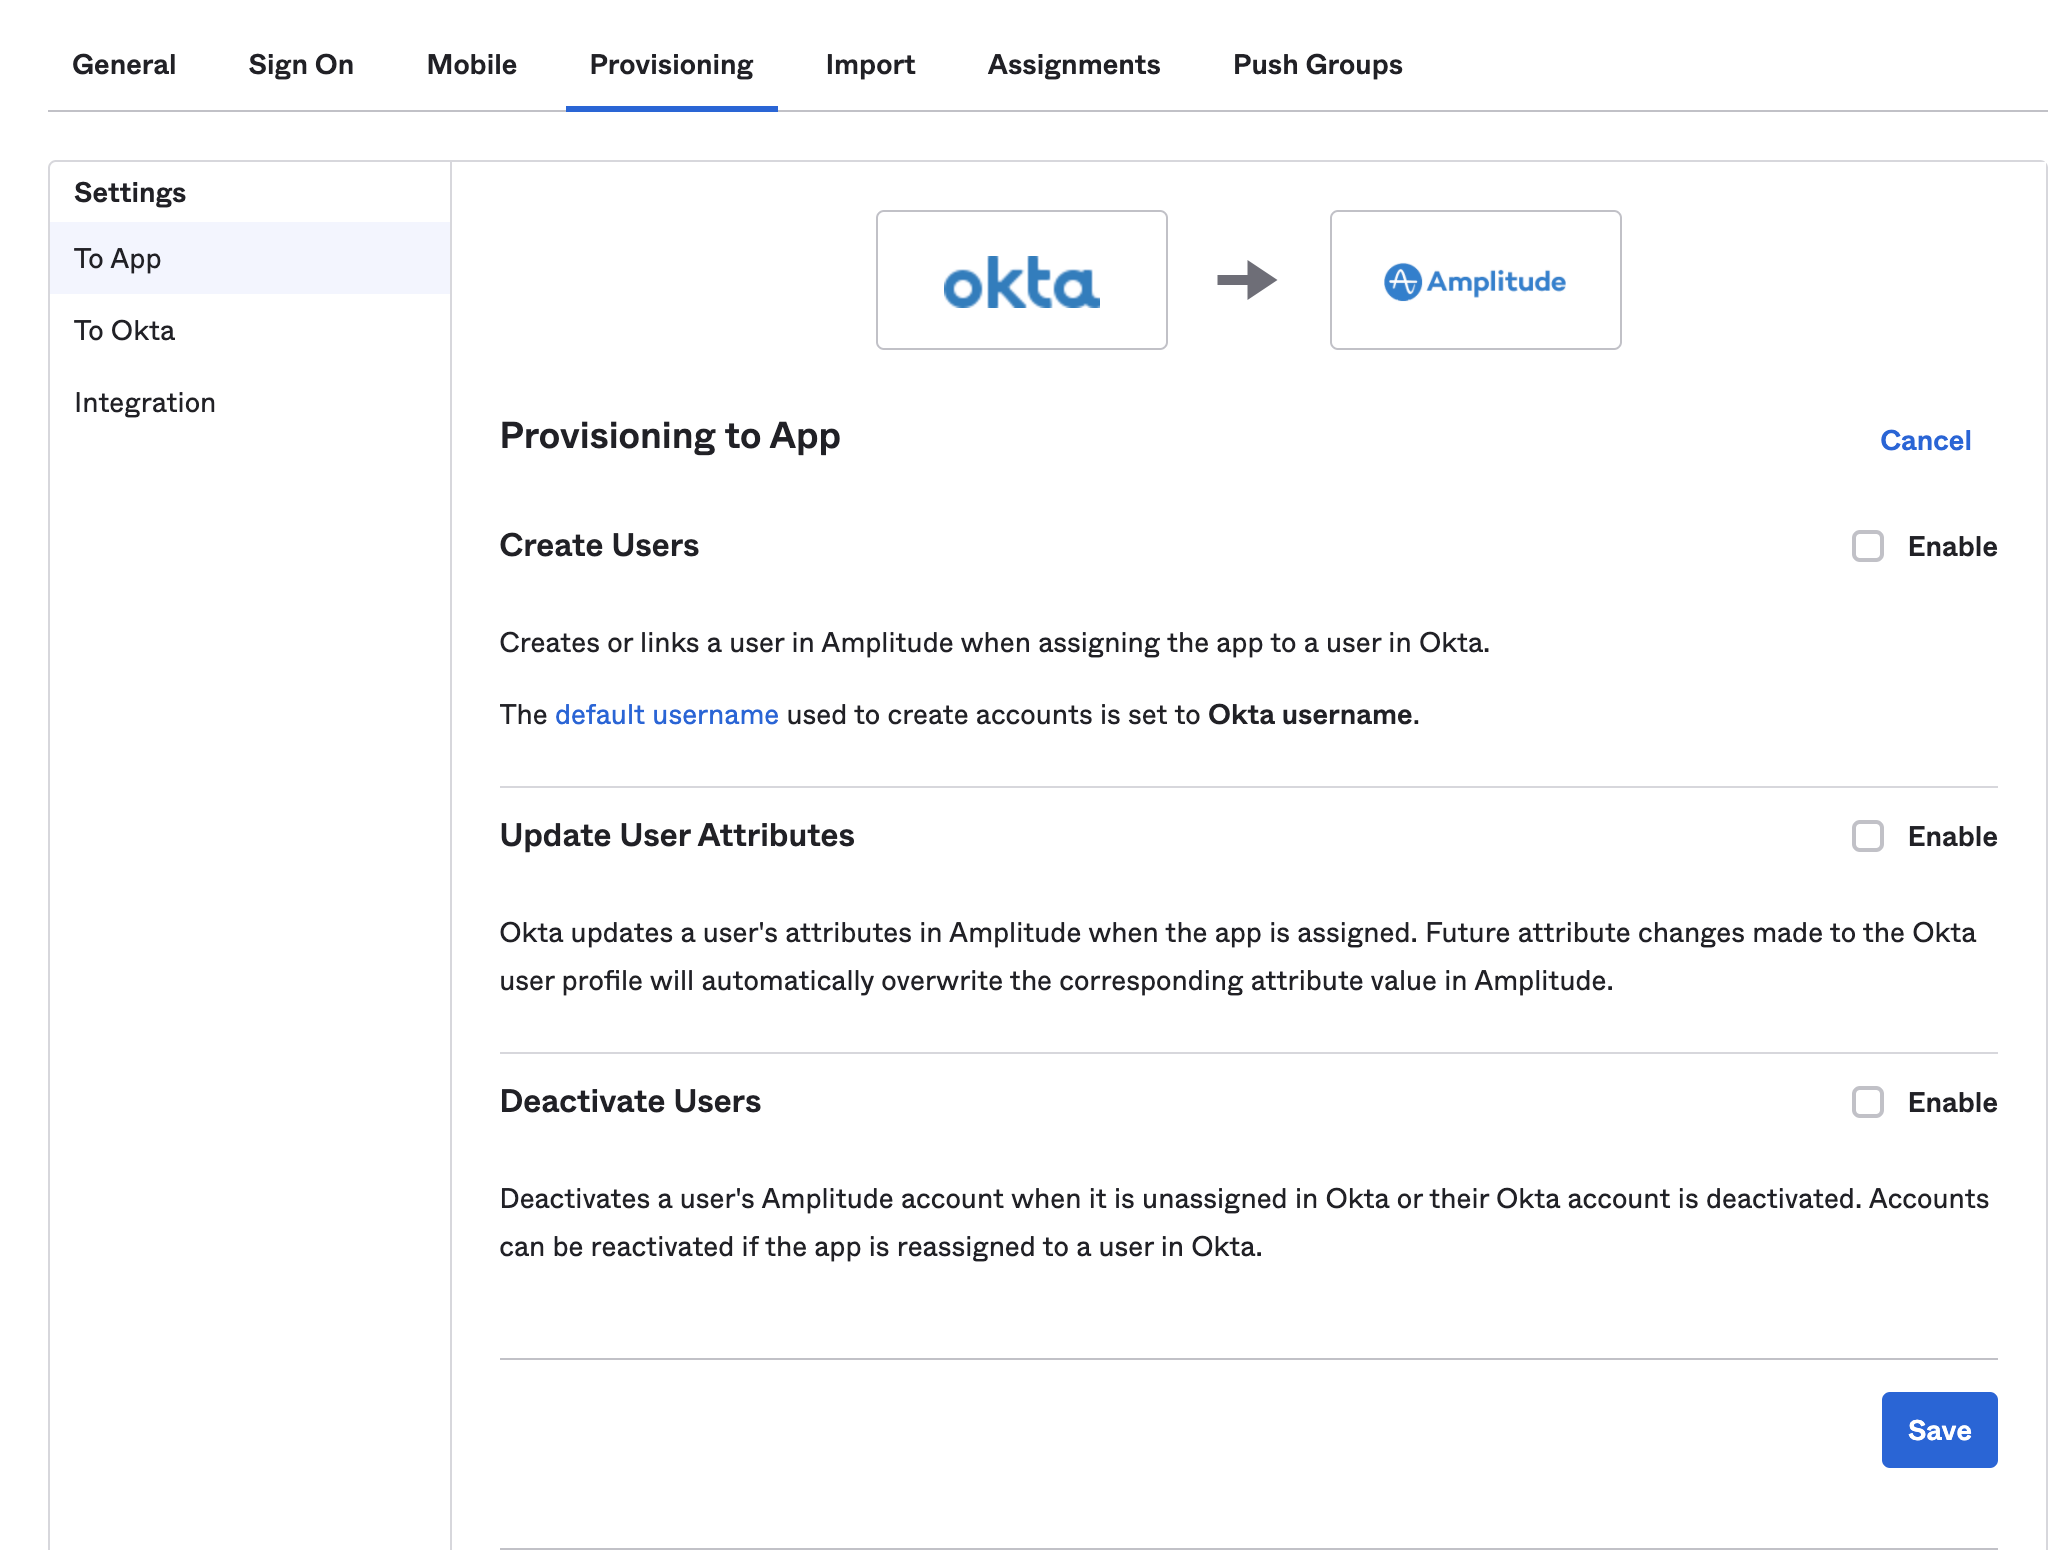
- Once Okta verifies the connection, select the provisioning actions that can Okta can send to Amplitude. Check any features in the To App section of the Provisioning tab that fit your needs. It's usually best to select all available features, to ensure that Amplitude's user records closely match that of your Okta directory.

Manual configuration (SAML)
If your SSO requires SAML support, use the manual configuration described in Set up single sign-on (SSO) for Amplitude using Okta.
Troubleshooting
Amplitude asks users to provide their first and last names upon first sign-up in Amplitude, though they may receive an invitation to join an organization before this happens. If Import Users is used while there are pending users that have never been in any Amplitude organization, the SCIM API uses placeholder values for their first and last names (NO_GIVEN_NAME and NO_FAMILY_NAME, respectively).
Additionally, there can sometimes be issues when authenticating an identity provider's application with Amplitude's SCIM API. For example, this can happen when testing the SCIM connection within Okta. In these instances, try this procedure:
- In your Access and SSO Settings tab, ensure that SCIM is enabled (remember to save the configuration if this needs to be enabled!).
- Click Regenerate SCIM Key and confirm the key regeneration (as discussed earlier, this immediately invalidates the old key).
- Copy the new key value and retest the configuration (see our technical guide if you'd like to construct your own requests outside of a provider's integration).
July 23rd, 2024
Need help? Contact Support
Visit Amplitude.com
Have a look at the Amplitude Blog
Learn more at Amplitude Academy
© 2026 Amplitude, Inc. All rights reserved. Amplitude is a registered trademark of Amplitude, Inc.