How To Create a Tracking Plan?
Learn about the benefits, processes, and best practices of creating a data tracking plan using our free tracking plan template.

Originally Published on June 7, 2022
This blog post is an excerpt from The Amplitude Guide to Behavioral Data & Event Tracking.
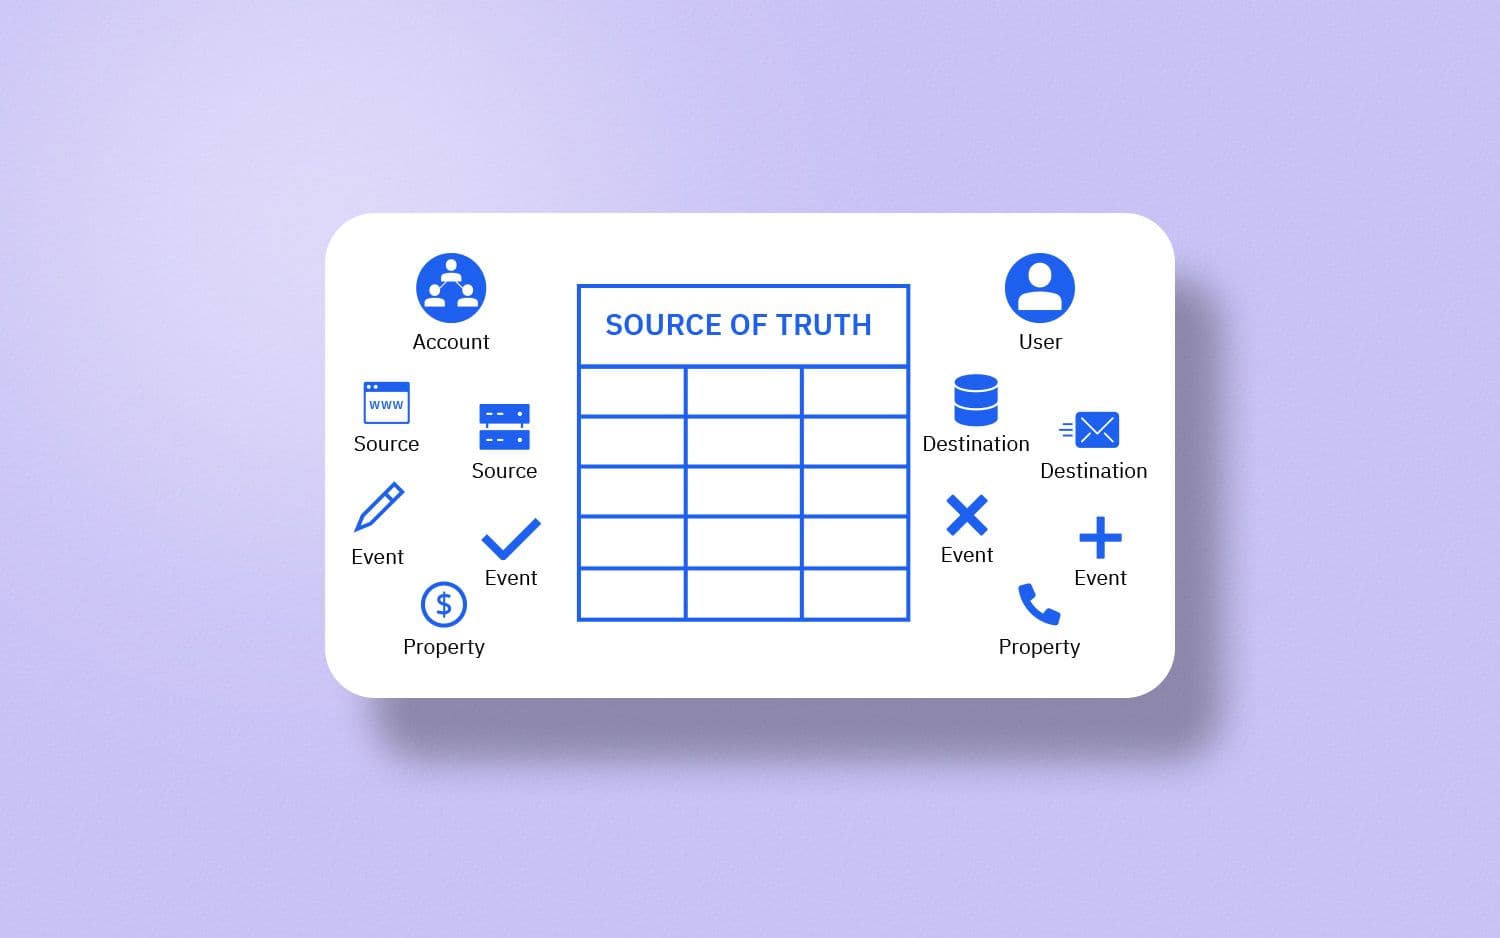
A data tracking plan (usually referred to as just a tracking plan) is a document that acts as a source of truth for your event data—it’s a living document that contains all the information related to the data you gather about your customers when they interact with your product.
This guide covers the process and best practices of creating a tracking plan and offers a tracking plan template that took many iterations and 100+ hours to create.
The benefits of creating a tracking plan
In practice, the tracking plan is updated every time you wish to do any of the following:
- Gather a new event, event property, or entity property
- Modify the name of an event
- Modify the name or the data type of a property
- Stop tracking an event or a property
Any piece of data that is not in your tracking plan should not be tracked and conducting regular audits of your tracking plan can prevent costly mistakes like the ones mentioned below:
- Data redundancy: Gathering the same piece of data multiple times
- Data inaccuracy: Gathering inconsistent or incorrect data
- Data mess: A combination of redundant and inaccurate data
Besides avoiding critical issues, there are many benefits of keeping an up-to-date tracking plan; the three main ones are discussed below.
Ease of implementation
Gathering data is a continuous effort that requires various teams to coordinate and execute new tasks regularly.
The tracking plan not only maintains a repository of what data needs to be tracked, but also specifies where the data comes from (data source), the tools and systems the data needs to be sent to (data destinations), as well as who is responsible for the implementation.
When working with multiple stakeholders, mentioning the purpose of each event or property can expedite the implementation process, especially when one or more people need to approve the tracking of each event or property.
Quick reference
After the implementation, different teams begin to consume and utilize the data across destinations—the tools and systems where the tracked data is sent. An updated tracking plan enables those teams to know the meaning and purpose of each event or property, making it easy for them to analyze and act upon that data.
For instance, when the product team wants to conduct a funnel analysis, somebody has to create the funnels inside a product analytics tool based on the events made available in the tool.
Similarly, when the growth team wants to run a new email experiment targeting a particular segment of users, they can refer to the tracking plan to easily set up the segment based on available events and user properties in their engagement tool.
Knowledge transfer
Albeit high in importance, knowledge transfer is usually an afterthought for most companies, especially in the earlier stages of setting up event tracking.
However, by maintaining a proper and updated tracking plan, companies can avoid many challenges that come with project hand-offs or employee onboarding.
Enabling new team members to get up to speed with everything that has been implemented in regard to event tracking can save weeks, maybe even months (depending on the amount of data being tracked) of back and forth between new and existing team members.
Best practices for creating a tracking plan
Enough has been said about the contents of a tracking plan; now let’s focus on what a tracking plan should look like.
The ultimate tracking plan template
The tracking plan template below is a Google Sheets spreadsheet that was created after a lot of research and many iterations to suit almost every industry. It also comes with some sample events and properties to give you a head start.
Please go ahead and make a copy of the template here.
The template contains the instructions as well as a glossary of terms. Once you go over the various tabs, head over to the tab labeled Events and Event Properties to get started.
The first 3 steps below apply to all types of products while the fourth step is only applicable to products that need to track account-level activity as in the case of B2B SaaS products.
- Events
- Event properties
- User properties
- Organization properties
What follows is a step-by-step process of creating your own tracking plan. Make sure you have the tracking plan template open in another window before proceeding. Let’s jump right in.
Events
Before you proceed, it is highly recommended that you list down the burning questions you have about your users and their product usage. Ideally, the burning questions should focus on understanding user behavior and the path a user takes to the activation event.
If you haven’t already, you might want to check out this guide that touches upon burning questions in more detail and will help you decide which events to track and what data to gather.
It’s also good to keep in mind that additional questions about your product may arise at the time of listing down events—for instance, you might not be sure whether an event should be tracked as a click or a process completion.
If such questions arise, be sure to list them down in your tracking plan under the sheet labeled Discussions—doing so will make sure you don’t forget to discuss with your team the most suitable way to define events and properties from the get-go.
List down the events
Under Events and Event Properties, list down the core events you need to track to answer the burning questions.
The sheet contains sample events Signed Up and Project Created, and their respective properties. For now, ignore the properties and just focus on the events.
These two events, for example, can answer the question “what percentage of new users created a project” and since every event carries a timestamp, you can drill down to fetch data only from a specific period such as the last 7 days.
In the above example, Project Created is the activation event, and to get to the point where one can perform the activation event, one has to first sign up (perform the Signed Up event).
Keeping this example in mind, focus on your activation event and list down the key events a user has to perform to get to the activation point. Make sure that you only list down key events that tell you something about the user journey.
By listing down too many events, such as every click that leads to the activation event being performed (project being created in the example), you will end up with many unnecessary events that will stretch the implementation period and leave you overwhelmed.
Best practice: Start by listing a handful of key events that help understand user behavior and the path to activation—ignore everything else for the time being.
If you still need ideas for what to track, check out Amplitude’s implementation guides with suggested taxonomy for ecommerce, fintech, streaming media, print media, and B2B SaaS. Even if your product belongs to another industry, you can gain some inspiration from these or other industry-specific taxonomies.
Add the source and owner
It is extremely helpful to mention the source where an event is being tracked. Doing so even makes it easy to assign an owner—the person responsible for the implementation of that event.
As you can see in the tracking plan template, Signed Up is a client-side event as it takes place on the client as soon as the signup form is submitted successfully.
Project Created, on the other hand, is a server-side event that relies on the completion of a process that takes place on the server. If the process fails for some reason, the event may not be performed even though the user might have completed all the steps to create a project.
Whether an event is tracked on the client-side or the server-side completely depends on your product’s architecture and the technologies it uses—specifying it in the tracking plan might require your engineering team’s help.
Additionally, you might also want to track events that take place on external systems connected to your product. For instance, if you want to track the event Support Ticket Created and you use a third-party ticketing tool such as Zendesk, the source of data will be Zendesk as that’s where the event took place.
Best practice: Bring in data from external sources in the second phase of your instrumentation.
Learn how to accurately collect, analyze, and activate your event data in The Amplitude Guide to Behavioral Data & Event Tracking.
Event properties
Defining event properties after adding some events is a better process to follow as you can mentally switch from thinking about events to thinking about the properties that should be associated with every event.
Add the properties for every event
Tackle one event at a time and think about the properties that give you more context about the event.
It helps to keep in mind that a user performs the Signed Up event only once (at the time of creating an account) and this is when the unique identifier user_id is generated.
If group properties are applicable to your product, the group identifier organization_id is also generated when a user signs up for a new account. In case a user is invited to join an existing organization, a new organization_id is not generated for that user.
Besides the system-generated identifiers, Signed Up carries a property for every piece of information that is gathered from the user when that event takes place (first_name, last_name, email, etc).
The property user_type helps differentiate those who signed up organically from the ones who were invited to join an existing account (Invited) or referred by someone to create their own account (Referred).
Interesting note: The event properties associated with Signed Up tell you more about the user (PII and traits); therefore, these properties also act as user properties and are added under the User Properties sheet.
Other events like Project Created can be performed multiple times and the properties associated with the event should only be restricted to those that provide context about one occurrence of that event.
Besides the project ID (project_id) and the timestamp (project_created_at), the properties project_name and project_user_count provide additional info every time a project is created (the event Project Created is performed).
Additionally, the user_id needs to be associated with every event to know who performed the event. If your product needs to track account-level activity, a group identifier such as organization_id also needs to be associated with every event.
Specify the data types and expected values
The importance of specifying the data type for every property was briefly covered in this guide. Doing so helps greatly in the instrumentation process and is a critical step toward maintaining data consistency.
Specifying the expected values for properties is also very helpful for those tasked with the implementation and also enables everybody to be on the same page when a property is supposed to contain predefined values.
Properties with data type enum or array should always specify the expected values—either the precise values (as done for user_type) or a reference to a specific list of values (as done for country).
Mention the destinations
The term destinations refers to the tools and systems where you wish to send the tracked data. It’s critical to keep in mind that data should only be sent to destinations where it is consumed or acted upon and that not all data should necessarily be sent to all the tools in your suite.
Personally identifiable information (PII) should be handled with utmost care as it can be misused if it lands in the wrong hands and should only be sent to the tools where PII such as name and email are needed—engagement tools used for event-based messaging (in-app or email) certainly need this info.
Hence, the best practice is to mention all the destinations for every property, even if most properties are sent to the same destinations.
User properties
As you might already know, user properties store various details and traits about users, enabling you to identify them and segment them based on those properties.
Also, as mentioned above, the data gathered from users at the time of signing up are added as user properties as these properties are essentially user attributes that contain a user’s traits and reflect their current state.
Some of these properties remain fixed while others are subject to change. If a user changes their name on file or the registered email address, the respective properties are updated with the new values.
Please note that the value of the property is_email_verified changes to false when the email is changed and once the new email is verified, is_email_verified changes back to true.
Other information gathered from users via surveys, such as the industry they belong to or their job role, is also stored as user properties—they help create user segments for analysis and activation purposes.
Go ahead and list down all user properties, their data types, expected values, and destinations in the sheet labeled User Properties.
Organization properties
Organization properties or group properties only apply to products that need to track user activity at an account level.
Like user properties, organization properties store details about organizations or accounts. Any piece of data that is not associated with a particular user and provides context about the account the user belongs to is stored as an organization property.
As you might already know, group properties are common for B2B SaaS products where a user is part of an account or organization with multiple users. The account name (organization_name) and its subscription plan (subscription_plan_name) are common group properties applicable to most businesses.
However, depending on your product, there could be many more properties associated with the account or organization and not a user. You must think this through and maybe even involve your engineering team when deciding whether a property should be a user property or an organization property.
Once you know for sure, go ahead and list down all organization properties, their data types, expected values, and destinations in the sheet labeled Organization (Group) Properties.
And that’s it—the first version of your tracking plan should now be ready so go ahead and share it with your teammates to start collaborating.
Get started with tracking
Whether you are looking to implement a customer data platform, a product analytics tool, or a customer engagement tool, the first step is to create a tracking plan.
And now that you know what that process looks like, you are equipped to make a big impact on your customer data infrastructure.
That said, you can take your tracking efforts a step further using Amplitude’s data governance capabilities to create a smart tracking plan where each event is instrumented accurately. Learn more in The Amplitude Guide to Behavioral Data & Event Tracking or get started for free in Amplitude today.
Happy tracking!

Arpit Choudhury
Founder, astorik
Arpit is growing databeats (databeats.community), a B2B media company, whose mission is to beat the gap between data people and non-data people for good.
More from Arpit


